
Special effects makeup can transform a plain base outfit into a costume people photograph, and you do not need a film crew kit to get solid results on Halloween night. This beginner guide sticks to products that work without advanced prosthetics, covers safety first, walks through five concrete looks, and explains how to get it all off without damaging your skin. The goal is a look that holds for a few hours, reads on camera, and does not leave you red for a week.
Disclosure: This post contains affiliate links. If you buy through them, we may earn a commission at no extra cost to you.
Safety First: Patch Tests, Allergies, and Common Sense
FX looks live on your skin, so safety outranks the perfect tear line. Follow these rules before you apply anything beyond powder and cream blush.
- Patch-test first. Test latex, spirit gum, wax, cream paints, and fake blood on the inside of your forearm at least twenty-four hours before you need them. If it itches, burns, or swells, do not use it.
- Avoid broken skin. Do not apply adhesives, latex, or alcohol-based products over cuts, cold sores, acne patches, or open blemishes.
- Check product labels. Use products made for skin, not for fabric or foam only. Many acrylic paints are not skin-safe no matter how good the color looks.
- Ventilate. Use adhesives and setting sprays in a room with an open window or a fan, and do not lean in to breathe the fumes.
- Have removers ready. Spirit gum remover, oil-based cleanser, latex remover, or plain mineral oil should be on hand before you apply. Do not scrape off latex or wax with your nails.
- Remove eye makeup carefully. Never use spirit gum or foam latex near the inner eye or on the eyelids. If you want eye effects, use cosmetic products designed for that area.
- Stop if it feels wrong. Pain, stinging, or heat beyond a mild cool tingle is a reason to stop immediately.
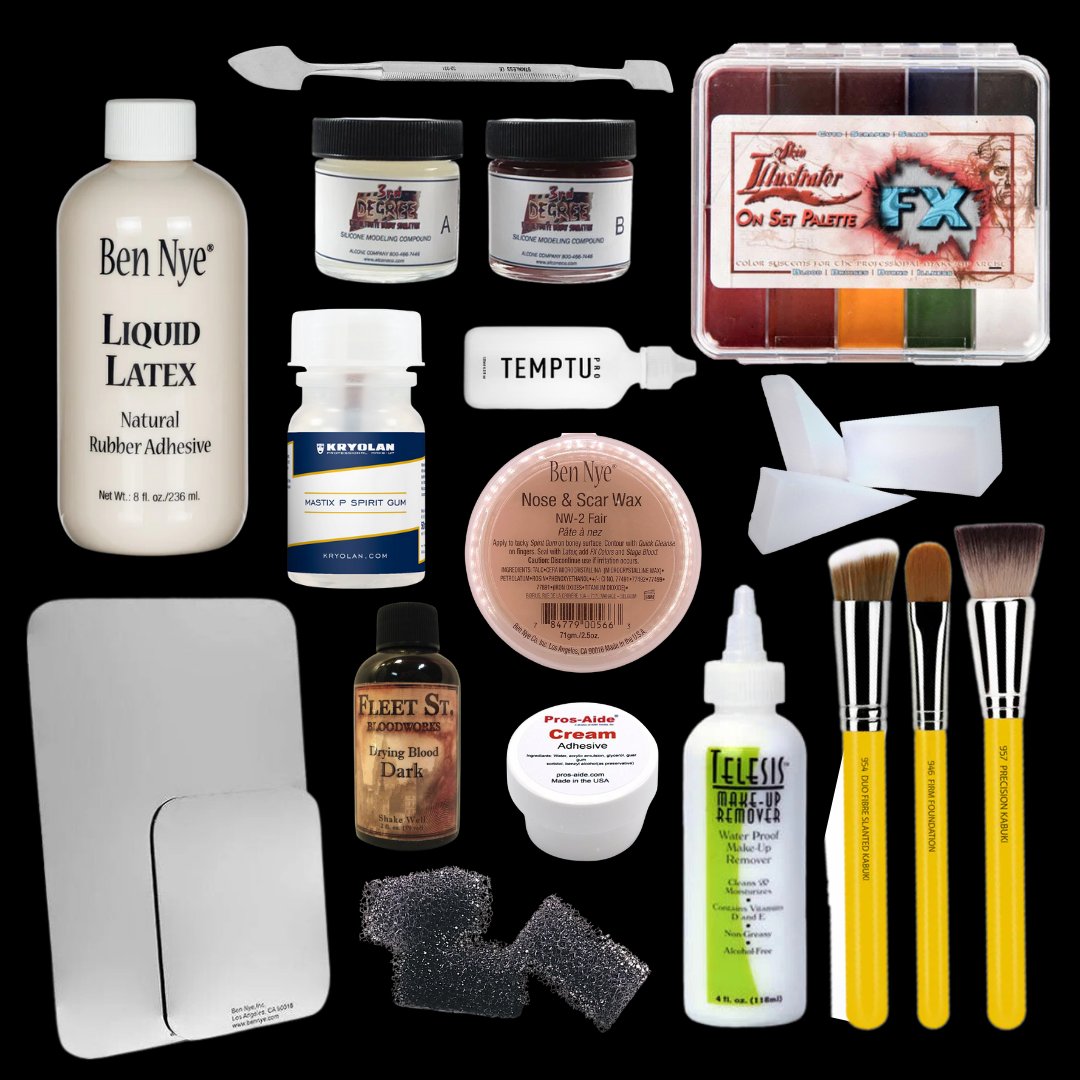
Your Beginner FX Makeup Kit
You do not need twenty pots. This core kit will cover all five looks in this post and reuse for years.
- Skin-prep wipes and barrier cream. Removes oils, helps with some adhesive removals, and creates a tiny buffer for sensitive areas.
- Foundation and concealer. To even out the base so paint does not cling unevenly. A shade one notch paler than your natural tone reads best under blood and bruises.
- Water-activated cream paints. Build color, blend with a sponge, and wash off easily with soap. Start with black, red, yellow, white, and a green-grey.
- Liquid latex. Creates raised textures: scrapes, flaps, and small blisters. Apply in thin layers with a popsicle stick or a clean brush, and never block your nostrils with it.
- Wax or putty. For deeper wounds with a “torn flesh” look. Easier to control than thick latex for small cuts.
- Spirit gum. Attaches light items: small chunks of tissue, fake scars, or thin prosthetic shapes. Only use the recommended amount.
- Fake blood. A thick gel for drips that stay put, and a thinner runny blood for fresh smears. Avoid putting either in your mouth.
- Setting powder and setting spray. Keeps cream paint from transferring to collars and coats. A light dusting prevents smudges more than adding more paint.
- Tools. Sponges, a stippling brush, a fine detail brush, cotton swabs, and a popsicle stick. Old tools are fine as long as they are clean.
These products are stocked by most costume stores, and for one-stop shopping you can browse beginner FX makeup kits here. Local costume shops also carry them in person, which is useful to compare textures before you commit, especially if you are sensitive to smells.
Look 1: Classic Zombie
Great for a first try: no large prosthetic, forgiving lines, and it photographs well under yellow streetlights. Time: ten to fifteen minutes.
Steps
- Base: Apply foundation one or two shades pale. Skip heavy contour for now.
- Undereyes and cheeks: Use a stippling sponge to dab purple-grey under the eyes and into the cheek hollows.
- Skin damage: Add small flecks of red and black around the mouth and temples. Use your fingers for the messiest parts to avoid perfect circles.
- Blood: Apply a thin line of runny fake blood from the corner of the mouth down the chin, letting one drop fall naturally. Do not overdo it.
- Set: Dust lightly with translucent powder and a short burst of setting spray.
Notes
Keep the color patchy: zombies look decayed, not airbrushed. Pair with torn clothes and a jacket from our horror costumes collection for a complete look.
Look 2: Slit or Torn Lip Wound
Uses a tiny amount of liquid latex or wax to raise the edge. This is the best introduction to texture work. Time: five to ten minutes.
Steps
- Outline: Mark a small diagonal across the top or bottom lip with a detail brush.
- Build a ridge: With a clean brush, apply a thin strip of latex or a small bead of wax along the mark. Let it dry for a minute (latex becomes tacky before full dry).
- Tear the center: Gently pinch or lift the very center of the ridge to create a small gap. For latex, use a toothpick to lift one edge, never force the whole line.
- Color inside: Dab dark red and black inside the gap to create depth. Add a touch of brighter red around the torn edge.
- Blood: Add gel blood only where gravity would pull it: along the lower edge, not up the nose.
Notes
Thin layers dry faster and look more convincing than one thick blob. Practice on the back of your hand first.
Look 3: Vampire Bite or Fang-Injured Neck
Subtle and readable, and it requires almost no latex if you only want punctures. Time: five to ten minutes.
Steps
- Base: Even out the neck area lightly. Avoid moisturizer in the spots you plan to redden.
- Bruising: Stipple red, then a touch of purple, in two small oval shapes close together. Fade outwards, not to a hard circle.
- Pinpricks: With a fine brush or a cotton swab, add two tiny dots of black at the center of each oval, then trace them with the brightest red you have.
- Trickles: A single thin drip of runny blood looks better than a painted stripe. Let it run down once.
- Set: Powder only the edges that might rub against a collar.
Notes
This look pairs well with pale foundation, dark lips, and fanged teeth. If you wear colored contacts, confirm they are labeled for cosmetic use and fit properly.
Look 4: Bruised and Beaten Face
Color theory does most of the work: fresh bruises are red, one to two days out they turn purple-blue, older they lean yellow-green. Layering all three at once looks staged but believable if you place them in the right spots. Time: five to eight minutes.
Steps
- Placement: Bruises follow bones: around the eye socket, along the cheekbone, and over the brow ridge. Avoid covering the whole eyelid.
- Fresh base: Stipple red in the center where impact would land, with the most saturation at the point of contact.
- Healing tones: Feather purple-blue around the red, keeping it away from the very center. Add a whisper of yellow-green at the outer edges to age it.
- Highlights and texture: Leave a tiny unpainted patch near the inner edge for the natural shadow, and avoid hard outlines.
- Finishing: No thick blood needed. A few broken capillaries (thin red lines with a brush) sell it more than a pool.
Notes
Blend with a clean, damp sponge between colors. Under harsh flash photography, bruise colors read much darker than they do in bathroom lighting, so test with your phone camera.
Look 5: Half-Skull Paint
The quintessential Halloween paint: readable, modular, and it works over anything. Do one half of the face, not the full skull, for your first attempt. Time: ten to fifteen minutes.
Steps
- Split line: Decide the centerline and mark it lightly with white paint. A ragged, broken line looks more organic than a ruler-straight one.
- Cheek and jaw: Cover the chosen side with white face paint, leaving the eye socket and the side of the nose open for definition. Blend to the hairline.
- Eye socket: Fill a large oval around the eye with black, and extend it slightly up into the brow to deepen the hollow. Leave a thin highlight on the top edge.
- Nasal cavity: Paint the side of the nose black, connecting it to the eye socket. Keep the nostril line clean.
- Teeth and cracks: Paint the teeth across the upper and lower lips as small blocks or triangular shapes, not full rectangles. Add a few jagged black cracks from the temple down towards the cheek.
- Shadows: Use a thin brush to trace the jaw with black, and add dark smudges under the cheekbone to make it pop. Add a tiny white highlight on the cheekbone edge.
- Set: Powder the white area lightly so it does not stick to gloves or a hood.
Notes
Keep the mouth mobile: do not paint your lips solid black. Leaving some natural movement looks better in photos. Pair this with a hooded robe or a skeletal accessory from our makeup and FX category for a complete look.
Removing It All Safely
Most of a beginner look comes off with patience, not force. Follow this order at the end of the night.
- Start with adhesives. Dab spirit gum remover or mineral oil on any glued areas and wait one to two minutes before peeling. Pull slowly, in the direction of hair growth, never straight up.
- Remove latex and wax. Peel latex in small flakes with your fingers. Lift wax gently and wipe with a dry cloth, then use oil to dissolve residue. Do not dig under it.
- Break down paint. Use an oil-based cleanser on cream paints and grease-based products. Work in small circles with a damp, soft cloth. Avoid scrubbing the eye area hard.
- Fake blood last. Blood often streaks when wet, so dab with a dry paper towel first, then use oil cleanser. Rinse with lukewarm water, not hot.
- Cleanse and moisturize. Finish with a gentle, fragrance-free cleanser and a plain moisturizer. If your skin feels raw, leave it alone for the night.
Practice Tips and Next Steps
- Rehearse twice. Do a five-minute test run the day before, then a full run-through the afternoon of Halloween. The second run catches mistakes the first missed.
- Photograph in context. Check your look in daylight and with your phone flash. Makeup reads differently under costume lights than at a bathroom mirror.
- Wear old clothes. Paint and blood transfer onto collars, and latex can catch on rough fabrics. A black button-up you do not care about saves your nice hoodie.
- Build up, not out. Thin layers of paint and latex look more natural and come off much easier.
- Keep it breathable. Do not cover your entire face in latex, and never occlude your nose or mouth. If you want a full-mask look, buy a skin-safe mask instead.
Where to Shop for FX Supplies
The best beginner kit is the smallest one you will actually use. Avoid buying bulk specialty adhesives until you know your skin tolerates a patch test and you enjoy the work. For a curated starter set, shop Halloween makeup and FX supplies here. You can also pair supplies with character-specific costumes in our makeup and FX category or with horror costumes if your look needs a mask to complete it. Start small: do the zombie look tonight on your hand, patch-test your adhesives tomorrow, and by Halloween you will have a look you can reproduce under time pressure without a single disaster.